

For some tag types, as the sender, you can pre-populate a tag and then lock it to make its content read-only, preventing signers from modifying it during signing.
How Read Only Tags Work
Read only tags are assigned to a specific recipient and is only visible to that recipient until they have finalized their signature. If you have a signing order enabled, once the recipient with the locked tag signs the document, the following recipients will see the value. When they are filling out the document, they will not be able to modify the content of the tag.
How are locked text/number tags different from prefillable tags or note tags?
Unlike prefillable tags, tags that are set to read only are still assigned to a specific signer and are only visible to them until they finalize the document. They also will appear on the finalized document unlike Note tags which .
How Can I tell if a Tag is Locked?
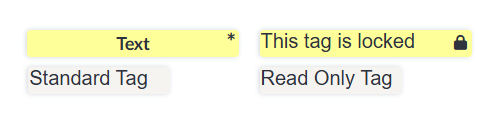
If a tag is locked, a lock icon will appear in the top right of the tag indicating that it is read-only.
Lock/Unlock a Tag
-
Begin by preparing your document as usual, adding files, recipients, and messages.
-
In the tags section of the document editor, place the tag in the desired location within your document.
-
Select the tag you wish to lock/unlock. (If you just added the tag, it should automatically be selected)
-
Fill in the tag with the value you want it to have.
-
In the settings panel, toggle the Read Only checkbox.
-
Once the tag is set to read only, you will not be able to edit the tags values. If you need to make any changes, you will need to unlock the tag, edit the tags value, and then set it back to read only.
Tip: If you have multiple tags that need to be locked you can select multiple tags at once for faster editing. (See, Multi-Tag Editing for Faster eSign Prep)