

To get started, here's the list of tags that are available for use with Signority. We'll go over each tag's function, settings, and what it looks like on the user end.
The following tags are available in Signority:
Signature Tag
Signature tags are used to collect recipients legally binding signatures. They are required by default but can be made optional.
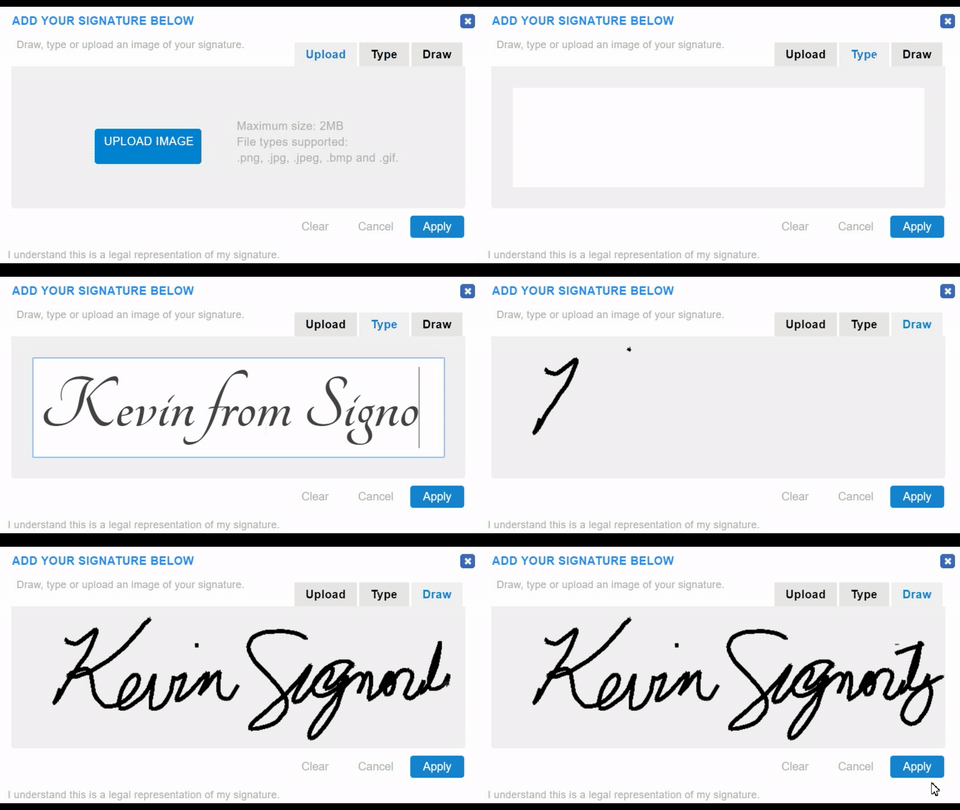
Signority offers three signature methods by default - drawing a signature, typing a signature, and uploading a picture of a signature. Senders and admins can also customize which signing methods are available to recipients in Signer Options.
Signer Experience
-
Select a signature tag
-
On the signature window, select a signing method
-
Click Apply to add your signature.
After the first Signature tag has a signature applied, further signatures are applied with a single click.
Note: If you chose to type your signature, the name that was entered by the sender is prefilled initially to save you time.
Related topics:
Initials Tag
Initials tags enables recipients to add their initials to specific sections of a document. This is often used to acknowledge individual clauses, terms, or pages within longer agreements (though Signority has other options for this use case, see Enable Signer Page View Evidence).
Initials function the same way as signatures. The settings are also the same, where you can change whether it is mandatory or optional.
Note: If you chose to type your initials, the initials of the name that was entered by the sender will be prefilled initially to save you time.
Related:
Text Tags
Text tags allow recipients to input custom information such as names, addresses, or other relevant details.
This flexible field supports both short and long-form text entries as the amount of characters and lines that they can enter will be dependent on the size of the tag and the font that you have set. To learn how to resize tags see, How to Resize a Tag.
Text tags can also be prefilled and even locked in read-only mode. This is similar to prefilled text tags but they are assigned to a specific signer so only they can see them before the document is finalized.
Related:
Number Tags
Number tags functions like text tags but accept digits only.
You can also set up various number formats including:
-
Phone numbers (10 digits no spaces)
-
Phone numbers (10 digits with dashes)
-
Phone numbers (10 digits including country code)
-
Social Insurance Number
-
Social Security Number
For more information, see: Number tag formatting and validation options.
Masked Text
When working with documents online, a document sender may need to obtain highly sensitive Personally Identifiable Information (PII)—like credit card numbers, social insurance numbers—from their recipient. Senders can maintain high standards of privacy and security while obtaining such sensitive information by using the Signority Masked Text Tag. Content entered into masked text tags is encrypted and will not be visible in the finalized document. The sender can retrieve the content in a CSV file.
Note: Be sure to rename your masked text tag to make it recognizable in the CSV. This is especially important if you are requesting more than one piece of sensitive information, since you will be retrieving the masked information through a .csv file.
For more information on masked tags, see: Collecting Sensitive Information with Masked Text Tags.
Related:
Note Tags
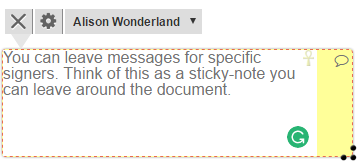
Not tags, act like sticky notes for you to leave for a recipient. They are assign to a specic recipient meaning they are only visible to that person. The recipient will see what is entered by the sender and when the document is completed, the tag will disappear from the finalized document.
Sign Date Tags
Sign Date tags are automatically linked to Signature tags that have been assigned to the same signer it is. When the signer enters their signature the date tag will automatically populate with the date the signature was applied.
Important: Sign date tags are 'read-only', so the signer cannot modify or manipulate the date that appears.
Date Tags
The date tag is an easy way for your signers to date their signature or parts of the document. The default date format is MM/DD/YYYY however, this can be modified by admins in Global/Team Settings.
To learn how to change a specific date tags format, see Change Date and Sign Date Tag Formats
Sender Experience
For the signers, the date tag is simple to use. Click it once to add the current date, and a second time to bring up a calendar to select a past or future date.

Checkboxes
Checkboxes are great for collecting multiple choice information from signers. This is great when the question allows signers to select more than one option. By default, checkboxes are optional, but you can set them to required.
For more information about adding checkboxes to checkbox groups, group validation, and checkbox styling, see Checkbox Tag's & Groups.
Radio Buttons
Radio buttons are useful when you have an either/or question, such as gender, education, etc.
When you drag a radio button over, you'll first be asked how many buttons will make up the group. The signer can only select one out of that grouping of radio tags. You can tell which radio tags are grouped together because the name of each tag will be the same. This means that if you entered the wrong number of buttons, you can add more by changing the names of the radio tags from the 2nd group to match the first.
Because these radio tags are grouped together, when they're mandatory, one of the tags in the group must be selected by the signer to satisfy those settings. For the signer, they simply need to click on the radio that is next to their answer.
Sender Experience
As a sender, you can pre-select one of the radio buttons before sending out a document to your signer. Don't worry, your signer will always be able to choose an option on their own.
Dropdown Tags
Dropdown tags allow a signer to choose one option from a list that you create. This is great for things like selecting which province or country someone is from, or which features or options are best for the signer, etc.
To learn how to set up a dropdown tags options, see Setting Up Dropdown Options for Dropdown Tags.
Sender Experience
When the signers use the dropdown menu, they will see the options you designated and can then select the most appropriate one for the document.
Attachment Tags
Attachment tags allow signers to upload and attach files to the document. This is really useful for accepting void cheques or bank statements, etc.
A signer can only add one attachment per tag, so if you need multiple documents from them, multiple tags will be required. You can make them optional if you wish.
Sender Experience
For the signers, when they click the attachment tag, the Files window will pop up and allow you to upload a file from your computer. When the file is successfully attached, the paperclip will disappear and be replaced with a checkmark as seen below.
How Attached Files Appear in the Finalized Document
All successfully attached files will be added as a new page at the very end of the document and will be included in the finalized document.