Did you know you can prepare your documents as Signority templates before uploading them?
With Anchor Text (Smart Tagging), you can embed Signority tags directly into a Word docucument so that when the document is uploaded, the tags are already there saving time and reducing manual setup.
Anchor Text lets you define:
-
Where a tag appears
-
What type of tag it is
-
Who it is assigned to
Despite sounding technical, Anchor Text is simple and efficient once you understand the format.
Note: Anchor Text can also be used in API integrations. Refer to the Signority API documentation for more details.
What is Anchor Text?
Anchor Text is a short string of characters inserted directly into your document to tell Signority how to create a tag.
Each Anchor Text string specifies:
-
Tag location
-
Tag type
-
Assigned signer
A basic Anchor Text string looks like this:
\t1\
Breakdown:
|
Element |
Description |
|---|---|
|
\ (Backslash) |
Starts the tag |
|
t |
Tag type (text tag) |
|
1 |
Assigned signer (first signer) |
|
\ |
Ends the tag |
This image shows you a partial page of content with Anchor Text placed where we want the tag, In the sample below you can see:
-
The anchor text string in the tag, note how the tag starts exactly where the backslash does.
-
We left room for the default tag size and have the period for the sentence at the end of the tag, before having the content continue. This will take a little practice to get right.

Note: We have the anchor text sting in red so that it is visible in the example, however, once you have the anchor text string where you want it, you will want to change its font colour to white. This will ensure that it does not show in your final document.
Adding Anchor Text to Your Document
Positioning the Tag
When placing the Anchor Text:
-
Insert the string exactly where the field should appear
-
Ensure there is enough space for the tag’s default size
-
Keep punctuation outside the tag when possible
Example
Instead of:
Please sign here\t1\.
Use:
Please sign here \t1\.
Hiding Anchor Text
Once your Anchor Text is placed:
-
Change its font color to white or whatever colour your files background is
This ensures the code does not appear in the final document while still being recognized by Signority.
Making Tag Optional
By default, all tags created through Anchor Text are required for recipients to complete.
To make a tag optional, add a lowercase o (not a zero) immediately after the first backslash:
Example
Mandatory:
\t1\
Optional:
\ot1\
Sizing Anchor Text Tags
When you add an anchor text string, Signority will add the default size of the tag unless defined. For more information on how to size Anchor text tags, see Sizing Anchor Text Tags.
Note: Only some tags can be resized. You can reference this chart for an overview of the tags available to add through anchor text. Tags that can be resized have their default size listed.
Signority Anchor Text Tag Strings
This table gives you the list of tags available for use with anchor text, the strings for both mandatory and optional tags, and the tags default size in pixels (width x height).
|
Tag Type |
Example Required Tag String |
Example Optional Tag String |
Default Tag Size |
|---|---|---|---|
|
Attachment Tag |
\a1\ |
\oa1\ |
Fixed |
|
Date Tag |
\d1\ |
\od1\ |
53px x 13px |
|
Initial Tag |
\i1\ |
\oi1\ |
85px x 27px |
|
Checkbox Tag |
\c1\ |
\oc1\ |
Fixed |
|
Masked Text Tag |
\mt1\ |
\omt1\ |
107px x 13px |
|
Note Tag |
N/A |
\ono1\ |
107px x 13px |
|
Number Tag |
\n1\ |
\on1\ |
107px x 13px |
|
Radio Button Tag |
\r1_groupname_1\ |
\or2_groupname_1\ |
Fixed |
|
Sign Date Tag |
\sd1\ |
\osd1\ |
53px x 13px |
|
Signature Tag |
\s1\ |
\os1\ |
107px x 33px |
|
Text Tag |
\t1\ |
\ot1\ |
107px x 13px |
Note: Only tags that can be resized have their default size listed.
Radio Button Options
Radio Button Options
Radio buttons are unique as a tag allow a signer to choose one option from a group.
Key Rules When Adding Radio Button Tags
-
Must be used in groups of two or more
-
All options must share the same group name
-
Each option must have a unique value
Radio Button Anchor Text String
Because radio buttons are in a group, there are a few additional values you need to specify in the anchor text string.
A basic anchor text string for a radio button looks like this:
\r1_groupname_1\
Breakdown:
|
Element |
Description |
|---|---|
|
|
Starts the tag |
|
|
Tag type (radio button) |
|
|
Assigned signer (first signer) |
|
|
Group name |
|
|
That specific radio button number value in the group (first button in group) |
|
|
Ends the tag |
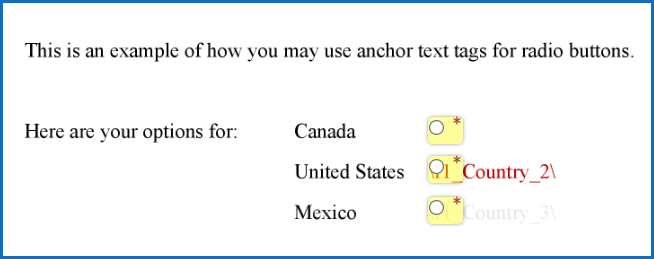
Below is an example of the anchor text strings place next to its label to add a radio button group that would allow signer to select one of three countries:
Canada    \r1_country_1\
USA       \r1_country_2\
Mexico    \r1_country_3\
This example is shown in the image below. The first Anchor Text has been set to a white font to reflect how it will appear in your final document and the second example is highlighted in red to illustrate the amount of space a radio button occupies compared to the Anchor Text string itself.