

By default, Signority inserts Anchor Text tags at the default size, however, sometimes your document layout needs something more precise. This article walks you through how to adjust the anchor text string to adjust the size of your tags so your document looks exactly the way you intend.
Default Tag Sizes
Below is a reference table of the tags that can be added using anchor text, along with their default sizes. Tags with “Fixed” sizes can not be resized.
|
Tag Type |
Default Tag Size |
|---|---|
|
Attachment Tag |
Fixed |
|
Date Tag |
53px x 13px |
|
Initial Tag |
85px x 27px |
|
Checkbox Tag |
Fixed |
|
Masked Text Tag |
107px x 13px |
|
Note Tag |
107px x 13px |
|
Number Tag |
107px x 13px |
|
Radio Button Tag |
Fixed |
|
Sign Date Tag |
53px x 13px |
|
Signature Tag |
107px x 33px |
|
Text Tag |
107px x 13px |
Note: Default sizes may vary depending on your teams Global Settings configuration.
Customizing Tag Size for Anchor Text Documents
There are three ways to define an anchor text tags size:
-
Change the Default Tag Size (Text and Date Tags Only)
-
Backslash Method (Tag Width Only)
-
Specifying the Width and Height
Each method offers a different level of control, depending on your needs.
1. Default Size Setting
Billing Admins or Super Admins can change default size for text and date tag in Global Settings. These new sizes become the default for all users in your organization when adding text and date tags to a document or template including when using anchor text.
For more information on how to change the default text and date tag sizes, see Change the Default Text and Date Tag Sizes.
2. Backslash Method
This method allows you to customize the tags width only. It uses the spacing between the backslashes to determine the tags width and the tags font size to determine the height of the tag.
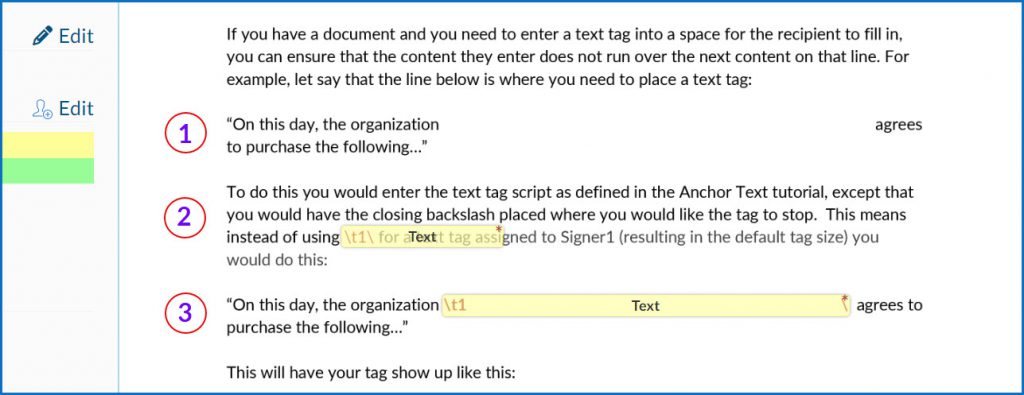
For example, let say that the line below is where you need to place a text tag:
“On this day, the organization agrees to purchase the following…”
If you were to just typing in the basic anchor text string for a text tag like this:
“On this day, the organization \t1\ agrees to purchase the following…”
When Signority adds the text tag, it will just use the default width of 107px which may not be enough to fill the intended allotted space or if its too long it could cause it to overlap with nearby text. This would also impact the character limit of the tag.
Using the backslash method, the tag expands to fill the space between the opening \t1 and the closing \.
So instead your anchor text string would look like this:
“On this day, the organization \t1 \ agrees to purchase the following…”
The image below demonstrats how the document renders in Signority and it recognizes the anchor text you have in the document:
-
The sentence without any anchor text added as above.
-
Using the default anchor text string (in red). Notice how it overlaps your content.
-
And, defining the text tag length using the backslash. Note how the tag surrounds the string of text from the opening backslash to the closing backslash, while the height of the tag matches the font's height.
Note: In this example, the anchor tag text is visible for demonstration purposes. When you are preparing your documents, you will want to change the anchor text font colour to white so they are not visible on the document.
Important Note
When using the backslash method, it is extremely important that your document uses the same font size as the Signority’s default (12 pt) or it will be noticeable in the final document. The tags may appear misaligned and the text inside the tag may not be properly positioned.
Note: Your default text size may vary depending on your teams Global Settings configuration set by your Billing or Super admin.
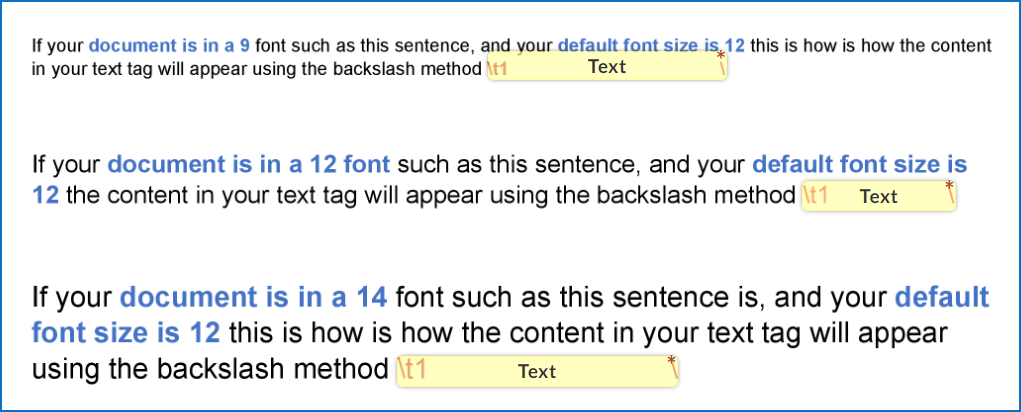
Below is an image of the same sentence in three different font sizes: 9pt font, 12pt font, and 14pt font. Notice that the tags width is the proper length for the text string entered, but the height of the tag is not snug around the text string like in example #3 in the image above. This is because the all of the tags are set for a font size of 12.
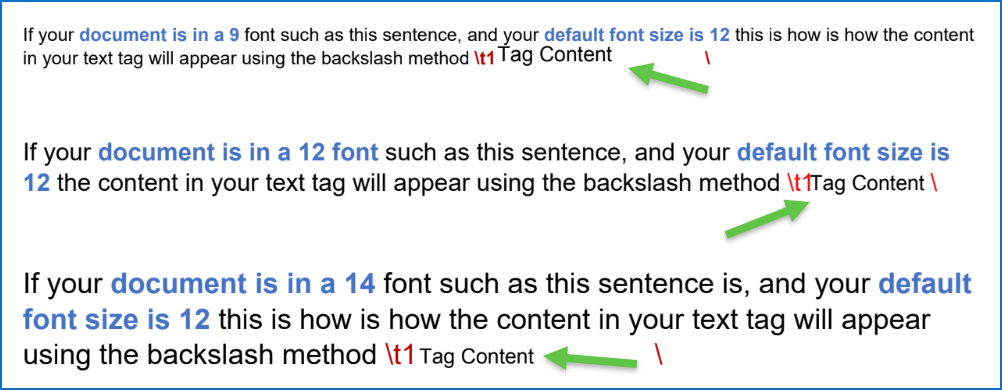
When recipients then type into these fields, the text size between the documents text and what recipients input into the tags will also be visibly different. This next image demonstrates how the content entered into each tag is reflected in the final document. Remember, each sentence is in the font size stated in that sentence, but Signority is set to a default font size of 12. Note how the text is sizably different in the first (larger) and second (smaller) example. You can also see that the text is also off from its optimal position making the document look sloppy.
If your document uses varying font sizes, use the Specify Width and Height method for better consistency.
3. Specify Width and Height
This method provides precise control by scaling the tag relative to its default size. This gives you much more flexibility and control over a tags size and where and how you can place it on the document.
To define a tag size using a specific width and height, you are going to use a ratio to the tag’s default size.
For example, to create a text tag assigned to recipient 3 that is twice as wide and 20% shorter in height, the anchor text string should looks like this:
\t3_2.0_0.80\
Breakdown:
|
Element |
Description |
|---|---|
|
|
Starts the tag |
|
|
Tag type (text tag) |
|
|
Assigned signer (third signer) |
|
|
Width of the tag (200% of default) |
|
|
Height of the tag (80% of default) |
|
|
Ends the tag |
Note: You must place an underscore ( _ ) after the number of the signer and one after the width.
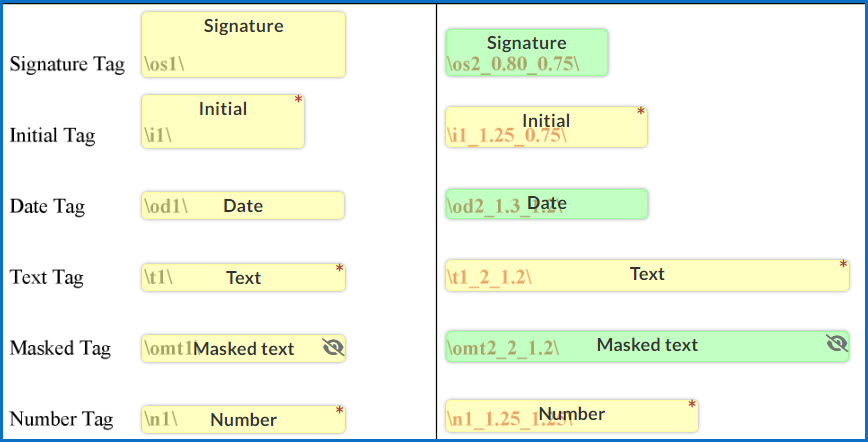
Below is an image showing regular anchor text tags on the left using the default tag sizes and the same tags using custom sizing on the right. You can see the string used in each tag.
Note: If both the Specify Width and Height method and the Backslash Method are used, i.e.: \t1_1.2_2.0 \ ; the Specify Width & Height overrules the Backslash Method.